How to Turn a Flat Design into a Layered Cake Topper
Creating a 3D cake topper from a flat design can be an exciting and rewarding project, especially when using tools like Cricut Design Space. Whether you're a seasoned crafter or just starting out, learning how to transform simple SVG files into layered paper crafts can elevate your projects and add a unique touch to your creations. In this guide, we'll explore how to turn a flat design into a stunning layered cake topper, with insights from Ella of The Craftaholic Studio.
Understanding the Basics of 3D Paper Crafts
At its core, creating a 3D paper craft involves layering flat shapes to give them depth and dimension. This technique is particularly popular in paper crafts like cake toppers, where a single design can be transformed into a visually appealing three-dimensional piece. By understanding how to manipulate SVG files and use design software effectively, you can create intricate and professional-looking projects with ease.
One of the most common tools used for this purpose is Cricut Design Space. It allows users to upload SVG files, adjust their size, and then separate the design into multiple layers. These layers can then be cut out and assembled to form a 3D effect. This process not only adds visual interest but also makes your cake topper stand out at any event.
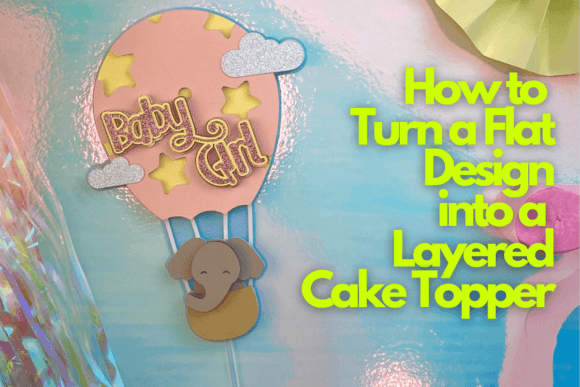
Why Use a Baby Elephant in a Hot Air Balloon as a Project?
Ella from The Craftaholic Studio chose a baby elephant in a hot air balloon as her example project for good reason. This design is both cute and complex enough to demonstrate the layering process effectively. The combination of different elements—like the elephant, the balloon, and the clouds—provides a great opportunity to practice separating and assembling layers.
This project is ideal for beginners because it uses a single plain design and one font, making it less overwhelming than more complicated projects. However, it still offers enough detail to help crafters understand how to work with layered designs. Plus, the final result is a charming cake topper that can be used for baby showers, birthdays, or other special occasions.
The Tools and Materials You’ll Need
To get started, you’ll need a few basic tools and materials. First and foremost, a Cricut machine (such as the Cricut Explore or Cricut Maker) is essential for cutting out your layers. You’ll also need a variety of paper types, such as cardstock, patterned paper, and maybe some metallic or glitter paper for added flair.
Other important items include:
- Scissors or a precision knife for trimming and cutting.
- Glue or double-sided tape for assembling the layers.
- Cardboard or foam board for creating a base or support structure.
- Markers or pens for adding details or text.
Ella also recommends using a weeding tool to remove excess material from your cutouts, which helps ensure clean and precise edges. Additionally, a cutting mat will protect your work surface and make the process smoother.
Step-by-Step Guide to Creating Your Layered Cake Topper
Now that you have your tools and materials ready, let’s walk through the process of turning a flat design into a layered cake topper. Ella’s method is straightforward and easy to follow, even for those new to Cricut Design Space.
Step 1: Import Your SVG File
Begin by opening Cricut Design Space and importing your SVG file. If you don’t have one, you can find free or paid SVGs online or create your own using design software like Adobe Illustrator or Inkscape. Once your file is uploaded, you can resize it to fit your desired dimensions.
Step 2: Separate the Design into Layers
Next, you’ll need to break down the design into individual layers. This involves selecting each part of the design and grouping them so they can be cut separately. For example, the elephant, the balloon, and the clouds would each be on their own layer. This separation is crucial for creating the 3D effect.
Step 3: Choose Your Paper and Cut
Once your layers are separated, choose the appropriate paper for each section. For instance, you might use white cardstock for the balloon, pink for the elephant, and blue for the sky. Then, send the design to your Cricut machine to cut out each layer.
Step 4: Assemble the Layers
After cutting, carefully weed out the excess material from each layer. Then, begin assembling the pieces by gluing or taping them together. Start with the base layer, then add the next layer on top, ensuring that each part aligns correctly. You may need to use small pieces of foam or cardboard to add height and depth between layers.
Pro Tips for a Professional Result
While the basic steps are straightforward, there are a few tips that can help you achieve a more polished look:
- Use high-quality paper for better durability and appearance.
- Experiment with colors and textures to add visual interest.
- Practice with simpler designs first before moving on to more complex ones.
- Take your time during assembly to ensure everything lines up perfectly.
Ella also suggests using a layering guide to keep track of which parts go where, especially if your design has many components. This can save you time and prevent mistakes.
Bonus Lessons for Mastering Paper Crafts
In addition to the main tutorial, Ella includes two bonus lessons that can help you further develop your skills. These lessons cover advanced techniques such as:
- Adding texture and dimension to your designs using different paper types and techniques.
- Creating custom fonts and integrating them into your projects for a personalized touch.
These additional resources are invaluable for anyone looking to expand their knowledge of paper crafts and improve their overall craftsmanship.
Conclusion
Transforming a flat design into a layered cake topper is a fun and creative way to enhance your paper crafts. With the right tools, materials, and techniques, you can bring even the simplest SVG file to life in a stunning 3D format. Whether you're making a cake topper for a baby shower or a birthday party, the process is both rewarding and satisfying.
By following Ella’s guidance and practicing regularly, you’ll not only improve your crafting skills but also gain confidence in working with digital design tools. So why not start today? With a little patience and creativity, you can turn any flat design into a beautiful, layered masterpiece.